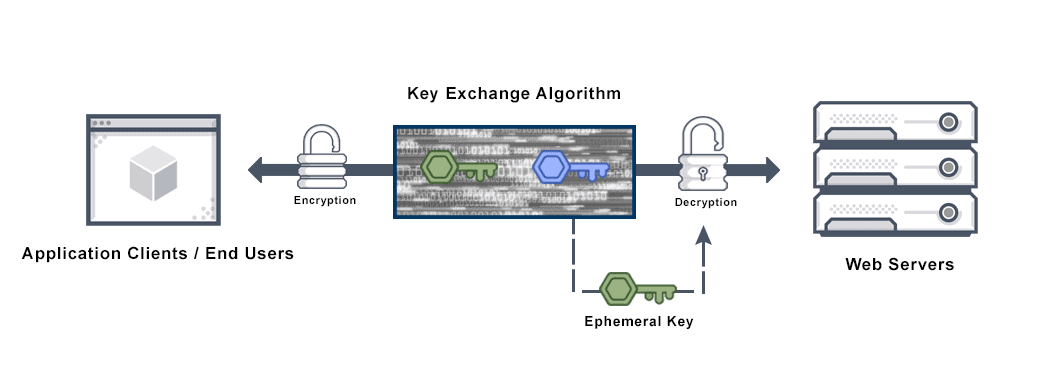
There are some great articles that explain more about the details of Forward Secrecy if you want to deep dive into it, it’s a somewhat complex yet excellent feature of key agreement protocols. I’ve added a few of these articles throughout as I get to the section on how to enable it in Apache.
From a venafi.com blog, here is a great basic description:
“Here’s the simplest way I can describe forward secrecy. Imagine if a new key was generated each time I went to unlock the front door of my apartment, with a changing lock to match. When I unlock the front door and go into my apartment with all of my heavy grocery shopping, I drop my key into my mailbox. That’s okay because next time I lock my front door and go out into the city to do more grocery shopping, a newly generated key appears in my purse, and the lock on my front door again changes to match. It doesn’t matter if a burglar acquires my old house key, it was only good for the last time I entered my apartment. Cool system, eh?”
https://www.venafi.com/blog/importance-forward-secrecy-tls-13

Reviewing the above diagram, “consider a basic instant messaging protocol using perfect forward secrecy (from an excellent article at avinetworks.com, diagram also from this same avinetworks link):
Step One: X and Y each generate a pair of asymmetric, long-term, public keys and private keys. They use an already-authenticated channel to verify the public-key fingerprints, or verify them in person. The verification process establishes to a high degree of certainty that the public key’s claimed owner is also its actual owner.
Step Two: X and Y securely agree on an ephemeral key for the session using a key exchange algorithm such as Diffie-Hellman. They authenticate each other with the keys from Step One during this process.
Step Three: X uses the session key negotiated in Step Two to encrypt a message with a symmetric cipher and sends that encrypted version to Y.
Step Four: Y decrypts the message with the key from Step Two.
Step One never repeats. Instead, the process repeats starting from Step Two for each new message sent. Depending on the conversation, X and Y’s roles as sender or recipient may switch. It is this generation of new session keys for each message that achieves forward secrecy.”
https://avinetworks.com/glossary/perfect-forward-secrecy/
How to Enable Forward Secrecy on Apache
(specifically as I did on a “click-to-deploy” wordpress VM on Google Cloud)
If you don’t know where your SSL Protocol Configuration location is, you can do the following to locate your SSL Protocol Configuration on your Apache server:
- Type the following command:grep -i -r “SSLEngine” /etc/apache2
- For example, /etc/apache2 is the base directory for the Apache installation.
- The command should output the available Virtual Hosts.
- Open the Virtual Host for which you are enabling Forward Secrecy.
In my case, it is the default-ssl.conf file. You may have a similar file where your SSLEngine config resides.
I recommend the following settings, i.e. add the following lines to your default-ssl.conf configuration file:
- SSLProtocol all -TLSv1.1 -TLSv1 -SSLv2 -SSLv3 #(this basically only enables TLSv1.2 and TLSv1.3), i.e. the latest and best versions of TLS as of 2020
- SSLHonorCipherOrder on
- SSLCipherSuite “EECDH+ECDSA+AESGCM EECDH+aRSA+AESGCM EECDH+ECDSA+SHA384 EECDH+ECDSA+SHA256 EECDH+aRSA+SHA384 EECDH+aRSA+SHA256 EECDH+aRSA+RC4 EECDH EDH+aRSA RC4 !aNULL !eNULL !LOW !3DES !MD5 !EXP !PSK !SRP !DSS +RC4 RC4”
- #Configure with RC4 as a last resort to support wide range and older browsers Use this configuration if you have a preference for GCM (Galois Counter Mode) suites (these suites are resistant to timing attacks) and you want to use RC4 only as a last resort in order to support a wide range of browsers and/or older browsers. To improve performance, use the faster ECDHE suites whenever possible.
- Restart Apache. sudo service apache2 restart
- To verify that you have enabled Forward Secrecy, you can use one of these types of websites to test your configuration: https://pentest-tools.com/website-vulnerability-scanning/website-scanner
- If all checks out, you have successfully configured Apache for Forward Secrecy.
Much of these Forward Secrecy enabling instructions come from this excellent article (I mainly did some abbreviation of it, different TLS settings. If you want more detail, see this digicert page for the details and explanation I removed):
Happy Forward Secrecy-ing!